5 / 5 / 2011
GOOD LUCK !!!!
This blog is specially made for my subject MPT1193(Authoring System) instructed by Ass. Prof Dr. Zaidatun Tasir.
The first step to creating a login page is to make a table of users. To create this table, use the follow phpMyAdmin code:
Create Table users (username varchar(20) NOT Null default “,password varchar(20) NOT Null default “);
Next, open up Dreamweaver and open a new HTML page, titled “login.php”. Connect this page to your database. If your connection is successful, the application window should show the details of your table. While you are still in the “login.php” page, locate the word “Common” on your top navigation bar. When “Common” is clicked, a drop down menu will appear. From this menu, select “Application”. Next, select the last icon on the navigation bar and click “Log In User”.
When “Log In User” is selected, a pop-up box will appear that allows you to fill in the details of your website login form. The first section of the pop-up box will have you fill in basic information about your login page. The second section will have you fill in details about your database. The third section will act as a redirection based on the table structure of your database.
If a successful connection is made between your login page and database, this information will be displayed in the “Validate using connection” area. The last section of the pop-up box titled “Restrict access based on”, should have the choice “Username and password” checked only. Once you are finished completing the form, click “OK”.
To check to see if your script is in the proper place, go to “Applications” and then click the link titled “Server Behaviors”. Your script name should be found in this panel. To edit this script anytime, simply double click. Save the “login.php” file to your computer, then upload to your website. Re-check the database to be sure that all information entered was correct.
You can attach behaviors to the entire document (that is, to the tag) or to links, images, form elements, and several other HTML elements.
The target browser you select determines which events are supported for a given element.
You can specify more than one action for each event. Actions occur in the order in which they’re listed in the Actions column of the Behaviors panel, but you can change that order.
To attach a behavior to the entire page, click the tag in the tag selector at the lower-left corner of the Document window.
Actions that are dimmed in the menu can’t be chosen. They may be dimmed because a required object doesn’t exist in the current document. For example, the Control Shockwave or Flash action is dimmed if the document contains no Shockwave or Flash SWF files.
When you select an action, a dialog box appears, displaying parameters and instructions for the action.
After attaching a behavior, you can change the event that triggers the action, add or remove actions, and change parameters for actions.
To edit an action’s parameters, double-click its name, or select it and press Enter (Windows) or Return (Macintosh); then change parameters in the dialog box and click OK.
To change the order of actions for a given event, select an action and click the Up or Down arrow. Alternatively, you can select the action and cut and paste it into the desired location among the other actions.
To delete a behavior, select it and click the Minus (–) button or press Delete.
All occurrences of that behavior in that page are updated. If other pages on your site have that behavior, you must update them page by page.
You can create a link that opens a related page and that passes existing parameters to that page. The server behavior is only available when using the ASP or JSP server models.
Before adding a Go To Related Page server behavior to a page, make sure the page receives form or URL parameters from another page. The job of the server behavior is to pass these parameters to a third page. For example, you can pass search parameters received by a results page to another page and save the user from entering the search parameters again.
Also, you can select text or an image on the page to serve as the link to the related page, or you can position your pointer on the page without selecting anything, and the link text is inserted.
If the current page submits data to itself, enter the current page’s file name.
When the new link is clicked, the page passes the parameters to the related page using a query string.
In order to display the record requested by the master page, you must define a recordset to hold a single record and bind the recordset columns to the detail page.
The simple Recordset or DataSet dialog box appears. If the advanced dialog box appears instead, click Simple.
The recordset can be identical to or different from the recordset on the master page. Usually a detail page recordset has more columns to display more detail.
If the recordsets are different, make sure the recordset on the detail page contains at least one column in common with the recordset on the master page. The common column is usually the record ID column, but it can also be the join field of related tables.
To include only some of the table’s columns in the recordset, click Selected and choose the desired columns by Control‑clicking (Windows) or Command-clicking (Macintosh) them in the list.
From the first pop‑up menu in the Filter area, select the column in the recordset containing values that match the value of the URL parameter passed by the master page. For example, if the URL parameter contains a record ID number, select the column containing record ID numbers. In the example discussed in the previous section, the recordset column called CODE contains the values that match the value of the URL parameter passed by the master page.
From the pop‑up menu beside the first menu, select the equal sign (it should already be selected).
From the third pop‑up menu, select URL Parameter. The master page uses a URL parameter to pass information to the detail page.
In the fourth box, enter the name of the URL parameter passed by the master page.
After uploading both the master and detail pages to the server, you can open the master page in a browser. After clicking a detail link on the master page, the detail page opens with more information about the selected record.


Configure the "MySQL Connection" window

Select the desired database

Open the "Recordset" window

Configure the "Recordset" window
To get access to a web server with PHP support, you can:
phpMyAdmin is an open source tool written in PHP intended to handle the administration of MySQL over the World Wide Web. It can perform various tasks such as creating, modifying or deleting databases, tables, fields or rows; executing SQL statements; or managing users and permissions.
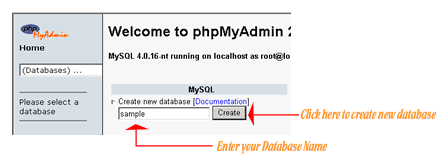
The following figure shows your PHPMyAdmin interface, just enter your database name and click the 'Create' button to create your database.

Now to create a new table enter your tablename and the number of fields in the table, then click the 'Go' Button.


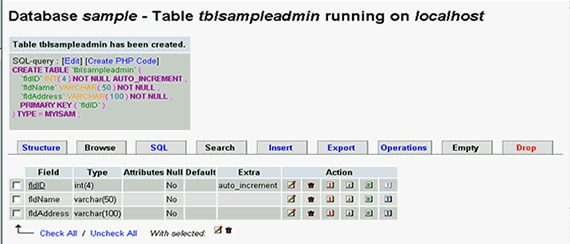
The following figure is displayed upon successful creation of your table:


1. To open the Windows Features dialog box, click Start, and then click Control Panel.
2. In the Control Panel, click Programs.
3. Click Turn Windows features on or off.
4. You may receive the Windows Security warning. Click Allow to continue. The Windows Features dialog box is displayed.
5. Expand Internet Information Services. Additional categories of IIS features are displayed. Select Internet Information Services to choose the default features for installation.
6. Expand the additional categories displayed, and select any additional features you want to install, such as Web Management Tools.
7. If you are installing IIS 7 for evaluation purposes, you may want to select additional features to install. Select the check boxes for all IIS features you want to install, and then click OK to start installation.
8. The progress indicator appears.
9. When the installation completes, the Windows Features dialog box closes, and the Control Panel is displayed.
10. IIS 7 is now installed with a default configuration on Windows Vista or Windows 7. To confirm that the installation succeeded, type the following URL into your browser, http://localhost.
1. Create a new site in Dreamweaver CS 3. Save the new site in c:\inetpub\wwwroot\project.
2. Create a database in Access and save the database in the folder c:\inetpub\wwwroot\data. The database must save in MS Access 2002-2003 with .mdb file extension
3. create a table in database and create the following fields:
i) name1
ii) username
iii) password
iv) remarks
4.For remarks field, choose Memo as its data type.
5. Then create connection in Dreamweaver CS 3. Open the database panel, click at + button, select Custom Connection String. Enter a name for the connection as dmx. Enter the connection string as "Driver={Microsoft Access Driver (*.mdb)};DBQ="& Server.MapPath("/data/guest.mdb"). click test to connect to the database and then click ok.
6. Create a new ASP VBScript page. Insert a form. Insert a table and insert the text and text field.
7. Give the name to the text field in Properties panel.
8. Save the page as daftar.asp in c:\inetpub\wwwroot\project
9. Then set the Insert Record to write data into database. Click Active Server Behaviors tab. Click the + button then select Insert Record, select the connection that you gad created then click ok. Save the file.
10. Create a new ASP VBScript page. Save the file as view.asp.
11. Create the text and text field for name, username, password and remarks.
12. Click Server Behaviors tab. Click the + button, select RecordSet. Select the connection that you had created. Select sort: name1 and Ascending to sort the data for viewing. Click test.
13. Activate Bindings tab. Click + button select RecordSet. Click at + button sign in front of the RecordSet and you can see all the fields in the database.
14. Drag nama into cell 1 in column 2 in the table that you create in view.asp. drag other fields also into the following cell in column 2. Draw a line below the table. Next highlight the table including the line below the table. Click the + button on the panel, select Repeat Region. Click ok.
15. Open back your daftar.asp file. Double click Insert Record behavior in Server Behavior and add view.asp in After inserting go to: click ok.
16. Click at Preview in Browser icon. Type any data and click save button. Automatically the view.asp file will be displayed and you can see the data that you typed.